Valentine’s Day … Roses … Time to Prune Roses!

Chrysler Imperial, Climbing; Oct. 2014

Chrysler Imperial, Climbing; Oct. 2014

In zone 8b, we are preparing for Spring and I’m always looking for a reason to be out in the gardens. So, with Valentine’s day here and gone, don’t forget to prune and care for the roses! Here are a few steps;

1. remove all dead stems

  • cut just below the brown/green interface where the dead, brown stem comes in contact with the healthy green tissue.
  • Use a rose cutting saw to remove large stems.
  • Remove stems that are the thickness of a wooden pencil

2. rake leaf debris and remove — to reduce the amount of any potential plant pathogens that will be splashed up onto the rose leaves during Spring rains.

3. Add compost

  • gently work into the soil area around the roots
  • add water if the soil is dry

4. Top off with mulch

5. Wait for upcoming new growth and blooms!

Dividing Daylilies (Part 2)


Clump of Daylilies

Clump of Daylilies

After preparing new bed space (Part 1), Here’s how I divided the daylilies, beginning with one Clump of Daylilies (see photo, left). this clump was dug with a hand spade; this clump has quite a bit of bermuda grass and weeds woven throughout the daylily roots–those can be removed as the clump is divided into single plants (also called “fans”).

Over time, grass, sedge, and other undesired plants will happily find a new home with  the daylily root system. Removing grass and weeds removes competition for nutrients and space in the soil. Before I divided the dayliles (and physically removed all obvious weeds and grass, several of my daylily varieties stopped blooming–I’ve recently discovered two varieties as they are now blooming. Do not underestimate the competition that grasses and weeds will inflict on daylilies. (There are also herbicides to remedy the bermuda grass and other weeds, just check with your local county extension agent to learn more about those chemical controls.) Continue reading

Dividing Daylilies (Part 1)

By the time that I decided to divide my daylilies (early Spring, this year—recall the mess—), I realized that I could identify only two of the unruly clumps. So, the choice was made to start raised beds that would give me room to sort them by variety. Here’s how I did it:

1) the daylilies were dug up and clumps were placed in pots with potting soil—essentially I stored the clumps for future transplanting to the new beds (see pots in picture at the bottom of this post). Continue reading

Start Gladiolas Early

Much going on in the garden now!

Gladiolas make wonderful cut flowers in May and June, but wind, frost, and excessive moisture can cause problems growing these gems!
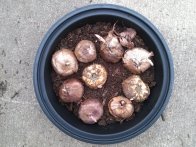
gladiola bulbs in takeout food container

gladiola bulbs in takeout food container

While there are some native gladiolas for this area, I like to have a little more color, so I start mixed color gladiola bulbs early — in takeout food dishes that have been washed.

Here are the steps:

(1) place about 1 inch of potting soil into the plastic dish.

(2) inspect gladiola bulbs; add those with emerging plant material (stems and leaves)
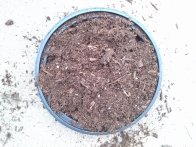
gladiola bulbs, just covered

gladiola bulbs, just covered

(3) Add just enough potting soil to cover the bulbs — there may be some emerging plant material above the soil.

(4) water until the potting soil is damp, but not too wet (if pooled water is visible — it’s too wet — drain the excess water. Watch for the protruding plant material to turn green.

Rather than tossing those plastic takeout dishes, save them for starting gladiolas — or other bulbs!

I’ve also used the long, shallow tubs sold for wallpapering (at home improvement stores). They are relatively cheap and you can put quite a few bulbs in them.

gladiola plants emerging

gladiola plants emerging

After about 10 days, the gladiolas have emerged (see long wallpapering container to the left).  The transition from off white to green is a great sign! Wait until all danger of frost has passed, then either transplant the bulbs to pots (space plants according to instructions on the box — e.g., 3 inches apart) for fresh picked, long life gladiola flowers in May and June. 

Some bulbs may not survive — it always happens that way — no worries, take care of those that do emerge and you’ll have wonderful flowers for late spring or early summer.

Finally — the plants may need support stakes to keep them from falling over.

Enjoy the glads!

 PS —- Once finished with the containers, wash and store them for next year. You won’t have to buy containers and these won’t end up in the landfill after a single use!

Prune Out Damaged Rose Stems

Damage Rose Stem

Damage Rose Stem

This rose has a damaged stem are that was bent and broken (see #1) by falling debris when the roof was replaced on the house. The stem can be traced to a branched area (see #2).

Farther down the stem is a large region  (#3) that demonstrates some kind of mechanical damage (hail hit the stem, or two stems may have been wind blown against each other). At any rate, both areas (#1 & #3) need to be pruned out of the rose; this can be done with a single diagonal cut (#4).

Once the cut is made, check if the inside of the stem is white; if not, continue cutting on a diagonal until healthy white tissue is observed. If the stem has damage even further down, it may need to be removed with a rose saw (large stem diameters are difficult to cut with pruning shears).

Time to Prune Roses …

'Livin' Easy' Rose

‘Livin’ Easy’ Rose

In this area (zone 8b) it is time to prune roses around Valentine’s Day. I did not prune last year so I’ve got some overgrown roses. All of my roses are “heirloom” or “antique” or “old garden” roses — I do not have grafted roses because they do not survive as well as the heirlooms and there are so many beautiful heirlooms now that it is easy to find a rose you like that will grow in your garden. Continue reading

Spring Prep ….

Hand Tools for Gardening

Hand Tools for Gardening

Now’s the time to pick up a set of hand tools if you need them. Gardeners will be out in mass as soon as the temperatures become milder and the notion of an approaching Spring becomes more reality than dream. It’s also time to check if cutting and shearing tools need sharpening.

Here’s a few tasks on my Valentine’s Day “to do” list (USDA zones 8-10):

  • prune roses (purchase, or get cutting tools sharpened, if needed)
  • plant potatoes
  • find and purchase mulch
  • find desired bulbs for Spring and Summer (they sell quickly!)
  • have soil tested
  • get garden plans together (what will grow, where)

… Dreaming of Spring Gardening …..

Texas planter picture