Posts by Christine

Christine's avatar

Foliar Damage on Livin’ Easy Rose

Fully opened blossom of Livin' Easy rose.

Livin’ Easy, Aug 10, 2013

Most rose varieties have some susceptibility to leaf damage from fungal pathogens; however, the damage does not necessarily kill the rose.

The Livin’ Easy old garden rose produces blooms most of the year in my gardens (except during the time period of frequent temperature drops below 32—usually from late November until early or mid-February). Continue reading

Christine's avatar

Passion Vine Flower Damage

Purple Passion Vine Flower Picture

Passion Vine Flower

We have been inundated with rain (no complaints here!) over the last three weeks — we received close to 6 inches of rain at our house. The temperatures have been cooler (relatively speaking), mid to upper 90’s for highs and low 70’s for lows—Spring-like for Texas. With rain and cooler temperatures, the insects appear.

Insect damage to plants can be as devastating as poor environments and microbes. Continue reading

Christine's avatar

What is a Weed?

A “weed”is any plant that is growing where it is not desired. In a naturalized field, wild flowers are just a component of the plant canopy. In a garden, however, those same wildflowers take nutrients, water, and space away from the desired vegetables.  In a grazing pasture for livestock, broad leaf weeds often shade over and sequester nutrients and water away from pasture grasses–making the pasture less efficient for maintaining the livestock.

evening primrose growing in the daylily bed pathway

evening primrose growing in the daylily bed pathway

In this picture, Evening Primose (also called “buttercup”) has taken over the stone walk path by the Daylily bed. In early spring, the primrose emerges as clusters of densely spaced, small broad-leafed plants. Later, the pale purple/pink blossoms open to reveal what we—as children— called “buttercups”. So, this particular “weed” has sentimental value and it is allowed to grow in some parts of the garden, especially around the daylilies.

After years of keeping meticulously “clean” flower beds complete with mulching and removing every plant not intentionally placed in the garden, I have begun to take a softer approach—especially since these “weed” flowers are better able to adjust to conditions unfavorable for the intended plants. Some weeds add natural beauty to the beds.

Here are a few more opinions about weeds:

Christine's avatar

Texas Sage Blooms to Announce Rain

The Texas Sage is an evergreen (zones 9, 10 and southern part of 8)  to semi-evergreen (farther north than zone 8), heat and drought tolerant shrub with small blue-green hued leaves and pink flowers. This shrub needs well-drained soil; it is located in a raised bed near an old garden rose that blooms only in early Spring.

Texas Sage in Bloom

Texas Sage in Bloom

Blooms appear on the Texas Sage throughout the growing season, each time it rains—and usually before the rain arrives. This shrub has yet to bloom when rain is not in the area—it’s a great predictor of rain, but doesn’t distinguish between a sprinkle or rain and a downpour.

The blooms in this picture first appeared on Saturday morning and we received 3/4 ” of rain on Saturday afternoon. We have a 30% chance of rain today—with slight chances for the next two days—and there were fresh blooms this morning. (Simply watering the shrub will not cause it to bloom; it apparently needs the pressure changes associated with rain.)

This particular shrub is located on the North West corner of the house, so it gets a massive dose of evening sun throughout the year, and often receives the brunt of Fall/Winter storm winds. It is now about 4 years old and has grown from around 18″ to 4 feet or so.

Christine's avatar

Hummingbird Surprise!

At lunchtime today, I glanced out the window and noticed 2 hummingbirds at the feeder I placed just outside the window. This was a great surprise because I’ve been trying to attract the hummingbirds to my feeders for several weeks now—only to watch them take an uninterested look and then fly straight to the red Salvia (also by the window).

Hummingbird August 6, 2013

This picture (right) was taken through the window blinds (dark regions top and bottom) and the visible bird was watching the second hummingbird (a brilliant green color) feed at the base of the feeder (clear nectar is visible at the bottom of the tear-shaped vessel). [Not a bad picture for a cell-phone camera!]

What I learned.

Last week, I researched hummingbird feeders and attracting hummingbirds and found this great resource about bird watching: http://www.birdwatchers.com/debtips.html .

Here’s the EXACT (verbatim) information and nectar recipe that Debbie provides on that birdwatchers website:

——————————————————————————————————–

I have found that this is the best recipe for making your own nectar–I feel the birds prefer it over the various instant mixes.

1 Part Sugar

4 Parts Water

Boil 1-2 Minutes
Cool & Store In Refrigerator
 

Never use honey or artificial sweeteners! Honey ferments easily, and can cause sores in a hummers mouth. Artificial sweeteners have no food value.DO NOT use red food coloring in your solution, as this could be harmful to your hummers. No testing has been done on the effects dye has on birds. Most feeders have red on them and that should be enough.

——————————————————————————————————–

[There is MUCH MORE information on Debbie’s bird watching website (link above) — take a look if you’re interested!]

When I used the commercially available red nectar, the hummingbirds wouldn’t feed — and they appeared to be confused by the red liquid, often tapping the sides of the container with their beaks as if trying to feed. I made Debbie’s recipe and put it out yesterday—today they are competing to sample the nectar!

Another thing I noticed is that the red nectar was much thicker than this home-made clear nectar, that may have something to do with it as well. Finally, I had the red nectar solution in a tree where the container has full afternoon sun on it and I noticed last night that the nectar solution was quite hot.

The hummingbirds will probably not be around a whole lot longer, but I’m really glad I figured this out and can enjoy them for the remainder of the season!

Christine's avatar

Rose Mallow and Belinda’s Dream in August

The Rose Mallow (also called Hardy Hibiscus) was planted about 5 years ago next to Belinda’s Dream — an old garden shrub rose.  (This picture was taken with a cell phone and all elements have a slightly bluer appearance than the real-world view.)

Pink rose blooms and dark pink rose mallow bloom

Rose Mallow and Belinda’s Dream

Blooms.

Bloom sizes; Rose Mallow (6 inch diameter), Belinda’s dream (2 to 2 1/2 inches in diameter); both plants are currently producing blooms.

Belinda’s Dream produces blooms from Spring through Fall; the largest and most abundant blooms are in the spring, reduced number and size throughout summer, and a few more larger blooms in the Fall.

The Rose Mallow begins blooming when the temperatures are consistently above 90 degrees and continues blooming through Summer and into the Fall; the largest blooms appear early in the blooming period (8 to 8 1/2 inches in diameter) and consistently reduce in size over the course of the summer (smallest about 4 inches in diameter).

The Rose Mallow blooms last a single day; they unfurl in the morning, are fully open by mid afternoon then shrivel and drop in the evening.

Belinda’s Dream blooms generally unfurl over the course of one day (by mid afternoon) and then slowly deteriorate over the course of 3 to 5 days (longer flower life in cooler weather).

Care.

Both plants have similar water needs and do well together on the same watering schedule (once a week by dripper hose). I use Miracle Grow fertilizer (blue crystals) to support vegetative (green) growth after the last frost. In rainy Spring seasons, I’ll use Miracle grow for roses (to encourage blooming) on both plants about a month to six weeks after the last frost.

Trim all roses on Valentine’s day (or the nearest Saturday following Valentine’s day–time permitting); Cut back all stems smaller than a pencil (average sized wooden pencil with lead) and cut just above a leaf bud location.

The rose mallow is self-sufficient, no trimming needed unless it becomes unruly (I don’t trim it because it will freeze down to the ground over winter).

Related articles

Christine's avatar

Easy Care, Ornamentals for a Small Garden

My small ornamental garden by the patio — and visible from a window — has several plants growing now; ferns, annuals and evergreens. Four plants from my window garden by the patio are identified in this blog entry; 1) red salvia, 2) fern, 3) purple “wandering jew” plant and 4) unknown lily that appears and blooms after rain.
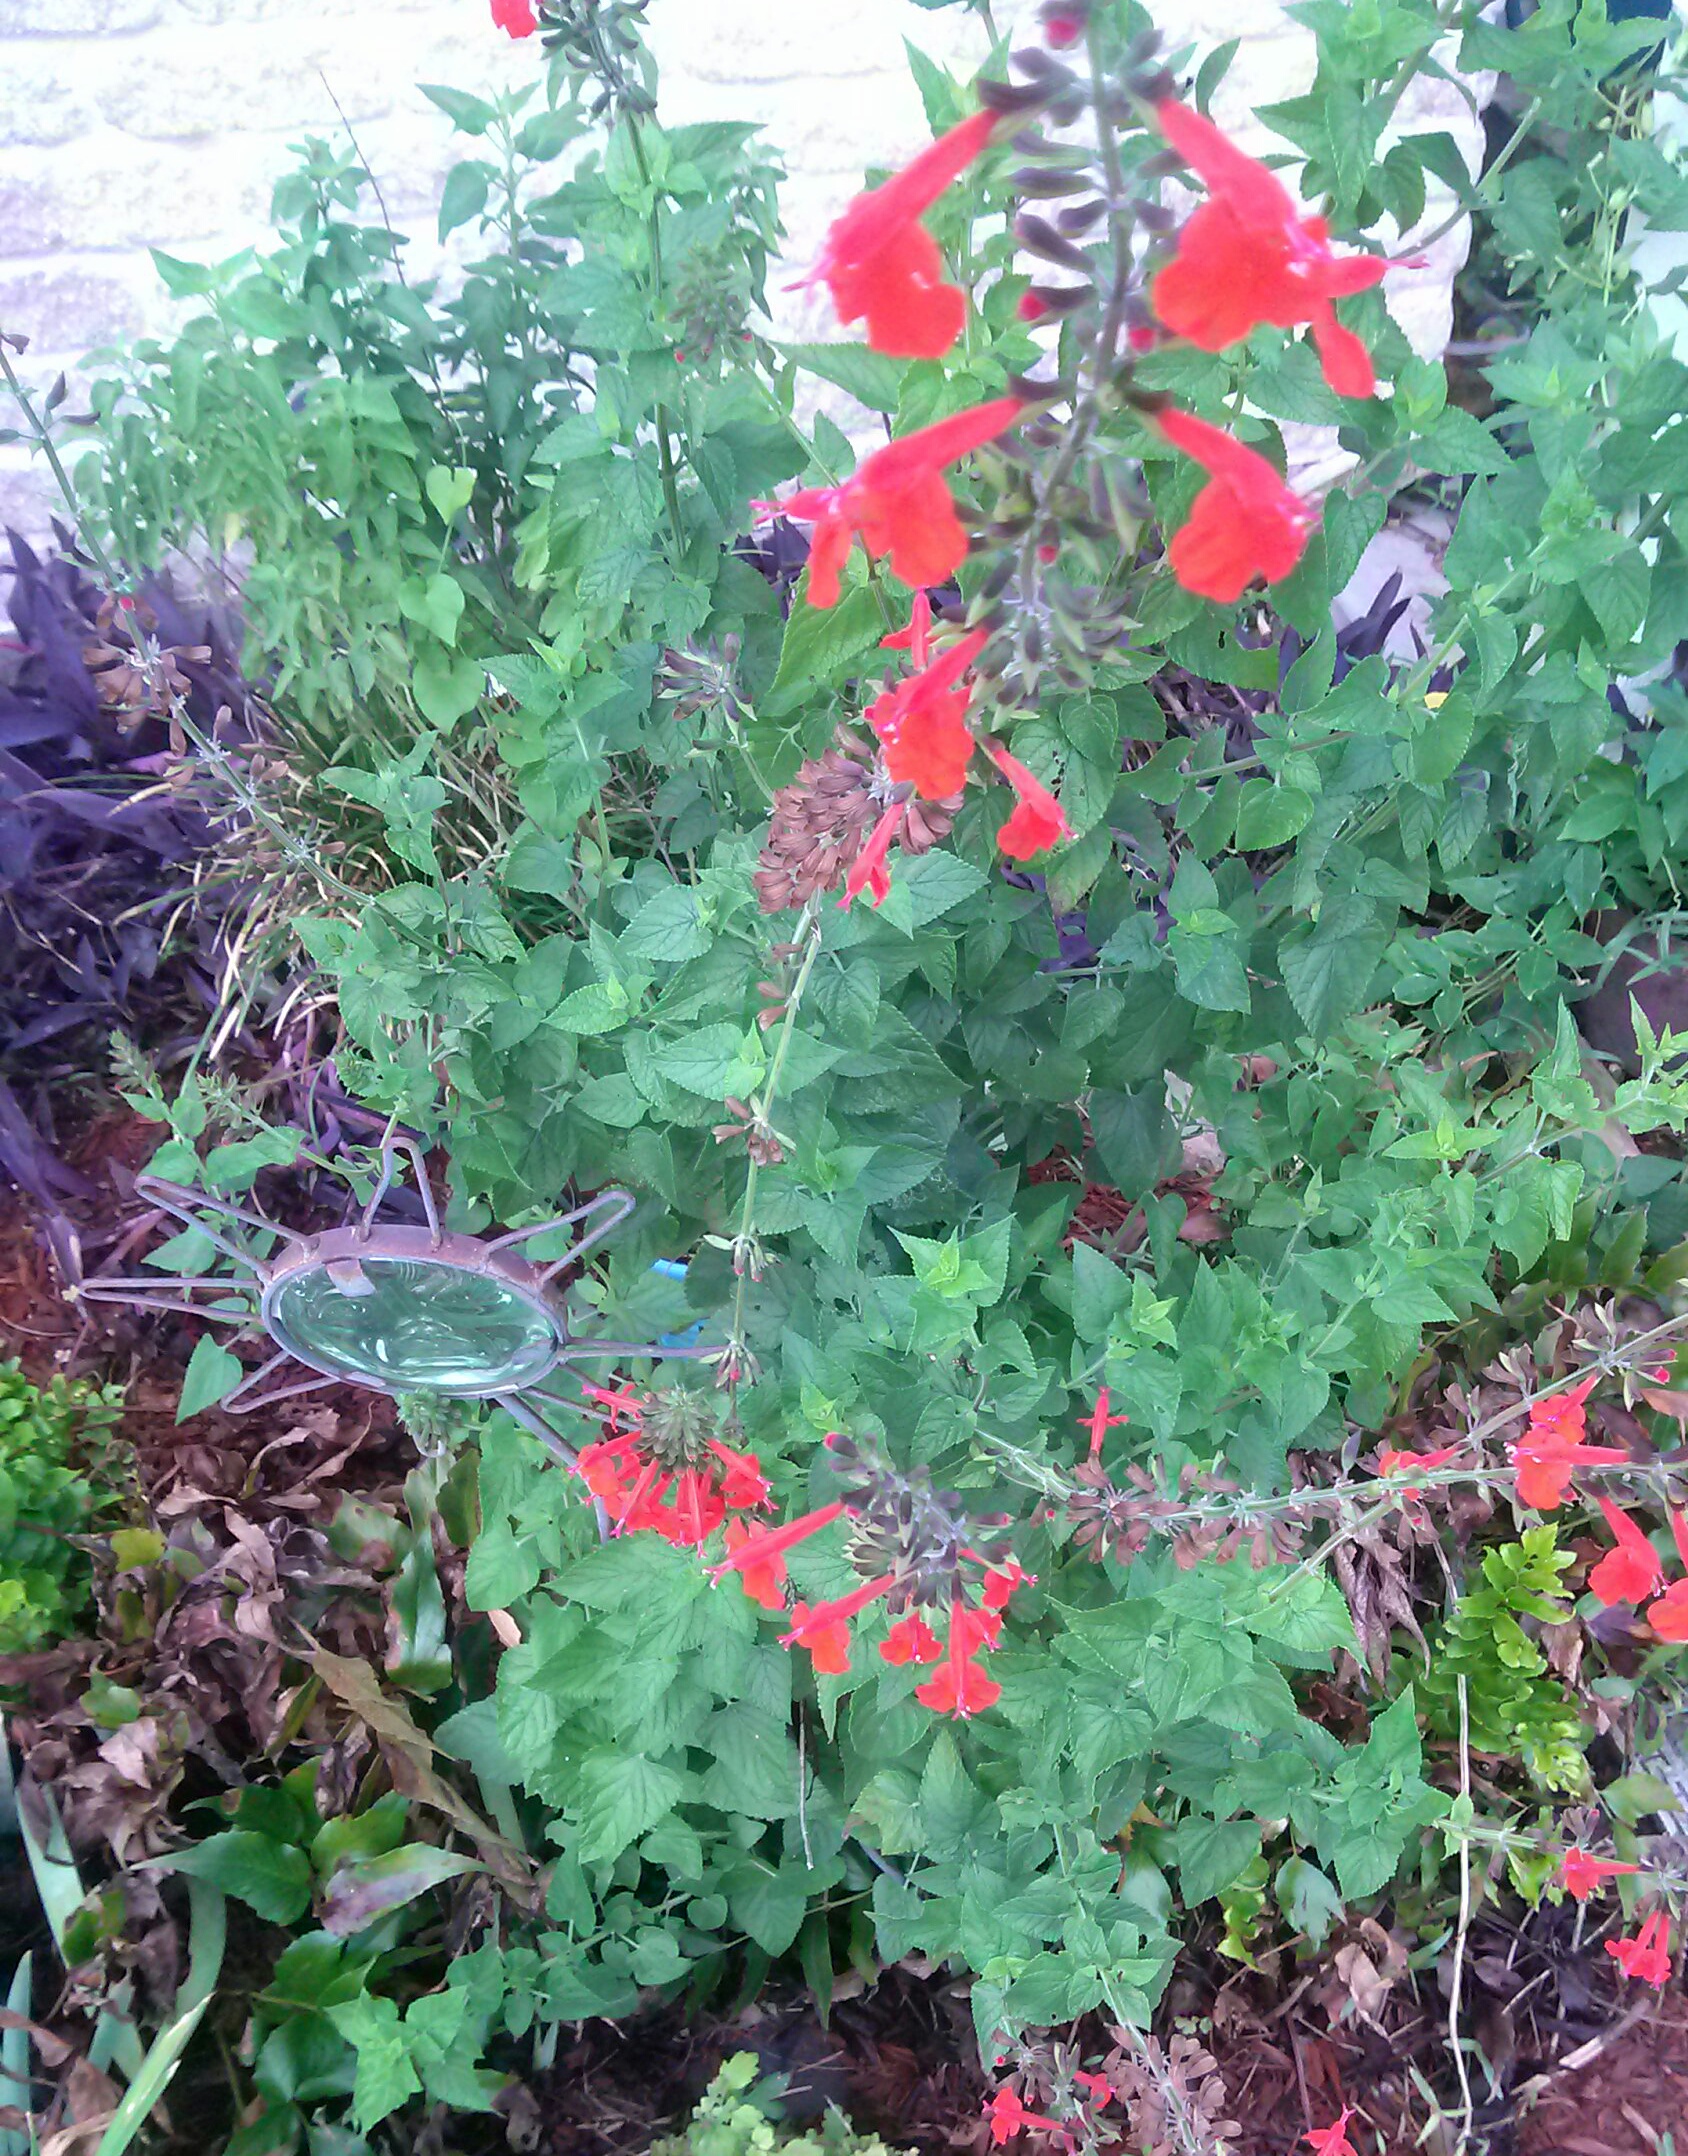
red salvia blooms

red salvia blooms


Red Salvia.

The red salvia is a perenial that returns without my intervention and each year, there are more plants! Each Spring, smaller plants sprout  from seed or from roots of previous plants.

Because of its easy care and awesome attraction for hummingbirds — I keep it where I can view the show of hummingbird colors from my window. I’ve seen hummingbirds fight for these flowers!

It is  very heat resistant, but I water it weekly for best blooming. The purple leaves and stems of Trandescantial pallida (second picture below) are visible on the left side of the salvia, in this picture.

Holly Fern, new Frond growth

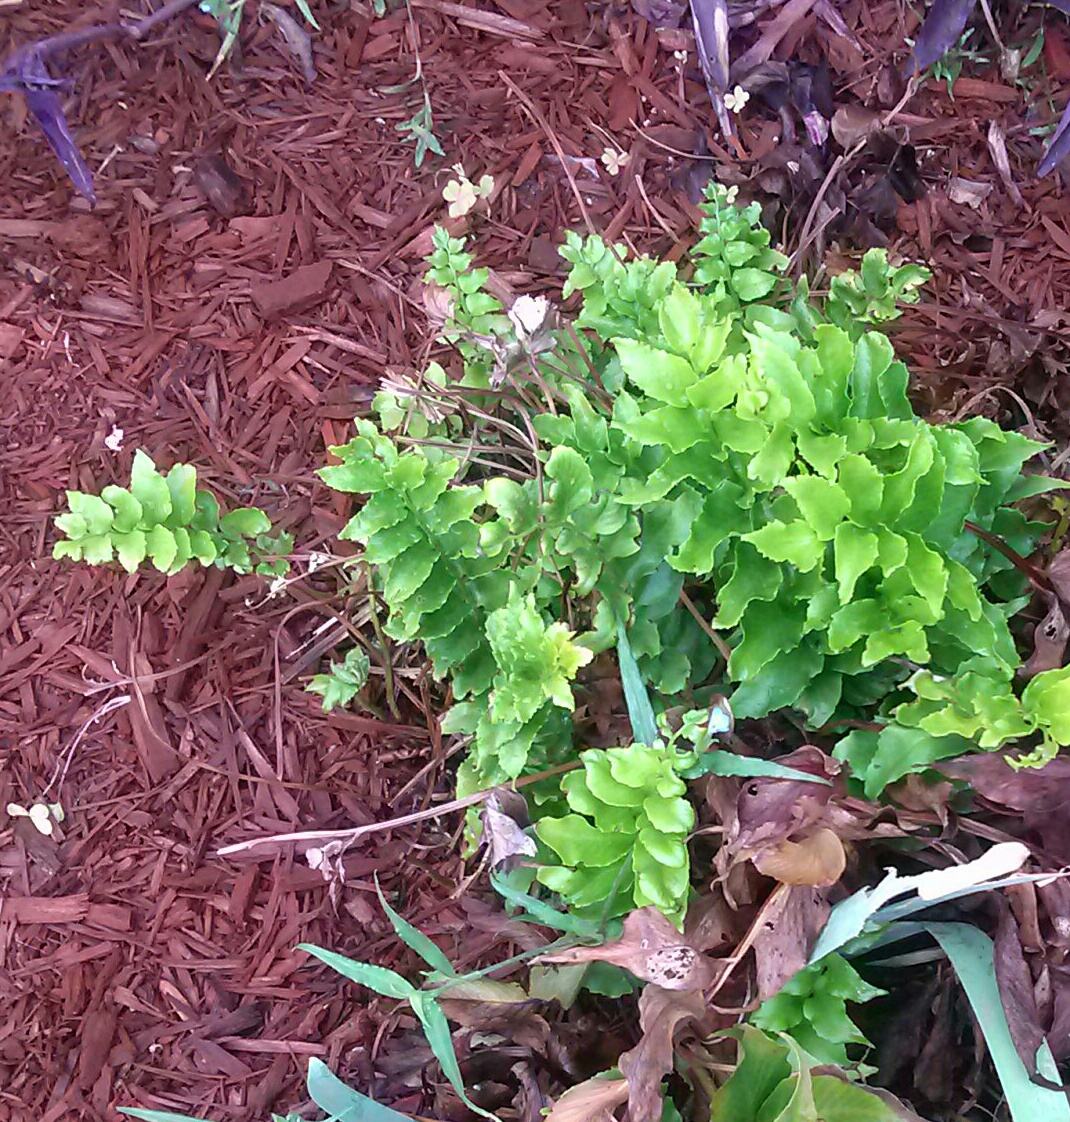
Holly Fern, August 28, 2013


Holly Fern.

The Holly fern thrives in the Spring until the temperatures are consistently above consistently above 90°. The higher temperatures burn the fronds and the dried material was removed prior to taking this picture. Although winter freezes and summer heat damage the fronds, fresh green foliage appears in spring, and again in late Summer and early Fall. Because of its consistent reappearance and new growth, the holly fern continues its residents among the other plants in the small garden.

More often, the holly fern just found growing in hanging baskets and parts located in the shade of a large porch. This fern is also grown as a houseplant in warmer temperatures (and I suspect, much colder temperatures).

“Wandering Jew” plant (Trandescantial pallida)

purple leaves and stems of the "wandering jew" plant

“wandering jew” plant

This evergreen (or ever”purple”?) creeping plant readily repreduces from cuttings. In fact, the plant is rather fragile and breaks apart with little effort—a cat walking though the bed can occasionally snap a stem. Each time the stems break, a new plant is formed — it can root without any assistance, and thereby spreads rapidly in a tropical type environment. It will freeze back slightly each each, but completely refreshes over Spring.

I added this plant to my small window view-able garden about 10 years ago, and this year it has made quite an appearance.

In this picture, rain droplets are still visible on some leaves and the tiny pink flowers have appeared.

Unknown Lily Variety 

An unknown pink/purple lily blooms

Unknown Lily–August blooms after rain

The unknown lily (right) is tiny (leaves are 4 inches to 8 inches long, and the beautiful pink blooms that appear after rain are about 4 inches across. this is a garden favorite that I forget about until after it rains and the lily appears. I’ve got this lily planted in 4 or 5 locations around the house. The entire lily dies back to the ground after the blooms appear — depending on the temperature because the plant stays around during cooler, moist time periods.

I do not know the identity of this Lily as it was given to me by a friend who received it from another friend and did not know the name either. At any rate, it is a great addition to my relatively “carefree” garden.

Christine's avatar

Sprouting Green Beans

Row of green beans start to sprout.

Green Beans, August 23, 2013

Green beans were planted on Saturday, August 17 and some have sprouted.

In order to keep them alive and growing, my husband placed a soaker hose along each row for more water to the roots, and less wasted in sprinkler irrigation. We tried drip hoses, but the time and cost were higher—and the soaker hoses can be run very low to conserve water.

With about 60 days to green beans, these should produce the first round about mid-October. If we have any early freezes or frosts, we’ll cover them with tarps at night and open them to air (when above freezing) in the day.

Two additional pictures (below) show the green beans sprouting through the row of ground.

Green bean sprout shown pushing up through the ground

Green Bean Sprout

Three different plants at three different ages.

Sprouting Progression
Christine's avatar

Fig Colors while Ripening

Cluster of figs shows stages from small green, to larger yellow, and finally purple ripe color.

Fig Development (July 9, 2013)

This picture, taken July 9, 2013, illustrates the various stages of fig ripeness. The most ripe and sweet figs are the darkest purple, figs beginning to ripe are yellow-ish and new figs are small and green. 

Currently, the there are small green figs on the tree, unfortunately, the heat keeps them from ripening. I’m keeping the tree watered and hopefully the heat will break and we can get a few more ripe figs. 

Rain is in the forecast for the next two days, so I’m keeping my fingers crossed!